What is the Air-Cooled VW Evap Emissions System?
Starting in the early 70’s, all VW’s were equipped with simple fuel vapor emissions control systems. This system did not deal with any kind of exhaust emissions, but was installed to deal with situations where the fuel in the tank would pressurize and vaporize due to different ambient surrounding temperatures, and then need to be dealt with.
For the Beetle, this system ran from the front fuel tank’s expansion chamber, along the passenger side rocker/heater channel, and then terminated at a charcoal canister under the passenger rear fender. This canister used pressure generated at fan shroud to “pull” fuel vapor from the assembly up front into a canister, and then push it back out to the air cleaner. Any volatile fumes are then sucked up into the carb and burned during combustion.
Note: Some of these vapors would be condensed back into liquid in an expansion tube in the bonnet in front or above the fresh air blowers. This would then return to the tank with any residual vapor going along the line to the charcoal canister in the rear to then be reduced further and then, if still in the system, burned off.
While focused on a modern system, the video below is a really good example of explaining how such systems work. The VW system of the 70’s is not all that different from the modern systems, though it is more passive than active, with the fan shroud providing just enough negative pressure to draw vapors from the entire system all the way from the tank up front in most early VWs.
Modern systems are far more active, some of them utilizing sensors to map the whole system to the ECU for optimal emissions control.
Should I run an OEM emissions canister on my fuel system?
Now I know that these systems, compared to modern ones, are quaint and most VW owners have long ago ripped out their 70’s era emission systems and vapor controls.
Personally, I believe that where appropriate, classic VW owners should maintain working systems and if possible, restore them to use on all vehicles that had them. I’d go so far as to say I wish there were some aftermarket companies out there making generic aftermarket emissions/vapor systems for classic combustion cars because there’s no doubt that volatile chemicals in the air emitted by vehicles are a bad thing.
I’ve seen people argue this and I just don’t think it is something to be arguing about in 2020 with the state of the environment as it is having suffered already from 100+ years of negligence out emissions outputs from vehicles, factories, etc.
Ultimately, it is your vehicle and you need to do what you need to do.
The fact that there are no aftermarket 1:1 replacements for key parts of the old VW emissions system, as well as the fact that there are really no modern items that can be easily modded to work does make it difficult to maintain or if missing, install a working system in a vehicle. Aftermarket fan shrouds don’t even have the hose connector for the system since they area all based on shrouds from before such systems were mandatory.
Basic Photo Disassembly
Ken Robinson on the Facebook Super Beetles Only! group has been restoring his 1974 1303 Beetle and recently redid his emissions canister.
Now I need to restore Murbella’s sometime in the future and also figure out what I’ll do with Żuczek. He didn’t have one when I bought him but I have the old one from the 74 I sold that I’ll likely restore as well if I can salvage it and remove all the crappy bedliner.
Ken was gracious enough to let me snag his step-by-step photos and repost them as reference.
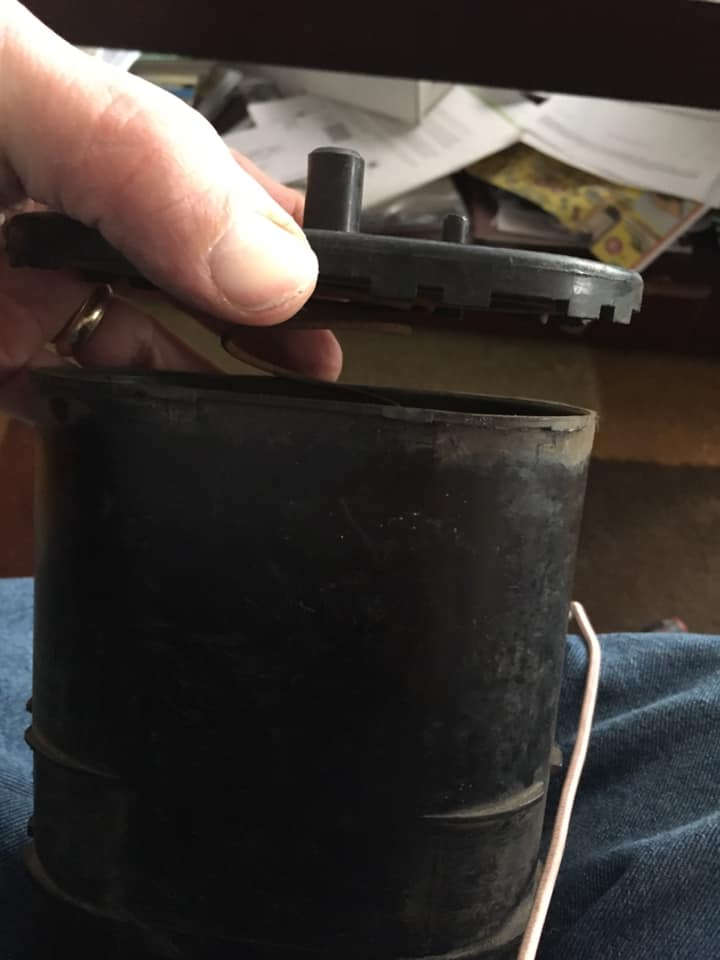
Essentially, for this specific part number, it is a best if slow disassembly is made along with cleanup and replacement of internal filters and activated charcoal. The key thing will be 40+ year old plastic to deal with to avoid breaking or cracking.
The key thing to remember about these is that they are no longer produced. Neither this specific part from 1974, or the later circular canister used on later air-cooled and the MK 1 and 2 Golf is made. There was a time when you could also easily acquire the canisters of the Mexican Type 1s (very similar to the Golf parts) but those were discontinued in 2003 with the end of the Type 1 production. You can find some NOS units still around and the command a high price as with most vintage/classic NOS parts.
Based on these photos, the general part disassembles as follows:


Note: Avoiding cracking the plastic at this stage is crucial.


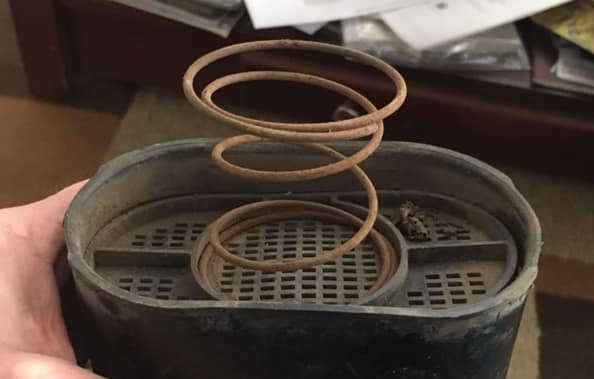
Under the lid (Fig 4) is a spring providing downward pressure over a filter plate above the charcoal.

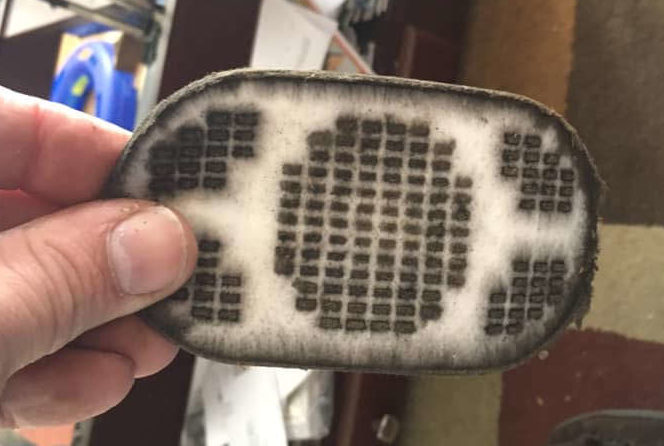
With the spring and filter plate removed, there is a fiber filter material (Fig 5). This allows vapor to pass through but between the holes in the filter plate, and this substrate, dust and debris cannot pass. This rests on the activated charcoal pellets which then fill the container.

Below the loose charcoal is another rigid plastic filter holder (Fig 5.). As with the one under the lid, this allows vapor to pass through and be sucked out.

Essentially, this is the base of the loose charcoal.

There is another substrate filter below the bottom filter plate, allowing vapor to move through but capturing charcoal dust and any other debris (Fig 7.)

There is another small foam filter in the upright tube in the bottom plate (Fig 8.)
With the entire unit disassembled, each part can be cleaned. However, if this unit’s never been restored, you can pretty much assume that the activated charcoal is saturated and has not actually been removing vapor for decades.
While this part number was used on early 70’s Beetles and other VW air-cooled engines, you can pretty much assume that everything is at least 45 years old or older.
The later model USA Beetle engines from 75 to 79 all have Fuel Injected engines and use a cylinder style canister that is shared with the Golf MK1 and other water-cooled VWs. Still, these are now all at least 40 years or older.
The parts should be carefully cleaned, and suitable replacement filter media and charcoal substrate should be found.

In Ken’s restoration of his canister, he used a BWD filter which could be cut to match the existing rounded rectangle. There are other suitable materials out there, BWD manufactures a variety of filters for evaporation canisters as well as other companies. The key is that it should be petroleum emissions safe so as to avoid degradation for as long as possible.
The material you purchase should be cut to fit the existing original filters.
The smaller bottom plate tube foam filter (Fig 8.) should also be of a petroleum safe material.
The large spring that is inside should be cleaned up and if necessary, surface rust removed and it should be painted with a rust preventative paint that is petroleum safe.
Once everything is cleaned up, and new inner filters are modded to work, the unit can be reassembled with fresh activated charcoal, especially one that is appropriate for gaseous vapor removal.
Video
YouTuber heiko’s garage posted the above video in 2015 on installing new charcoal in a Bus canister. This vid can help to show how Ken’s photos all work together.
Additional Information
- I have acquired and tried to modify several modern vehicle emissions canisters to work with the simpler more passive 70’s air-cooled system but none has been appropriate.
- Perhaps in the future, someone with appropriate media and 3D printing can created new basic versions of these canisters. The units themselves have no moving parts and are essentially 5 pieces of plastic that interconnected. I’ve inquired with a few people but nobody wanted to deal with the initial templating for the design.
- Even the amazing aftermarket fan should produced by Concept-1 in Canada is missing the host connector to make a vapor system possible. Once could weld a connection if necessary.
- On non-stock dual carbs, the output from the emissisions canister can be fed into the 1/2 cylinder carb’s air filter via a T with the oil breather. This can be done with most dual intake fuel injection systems that may be added to the Type 1 engine.

